
Since January, my main focus has been on building a web app to help teachers mark work in a classroom environment with student involvement. All students in a classroom would use their smartphone or a class iPad to take a photo of their work. Each student is then presented with two pieces of work from other students in the class (all anonymised). They have to then make a judgement on which they think is best. They repeat this process over and over for different pairs of work. After about 20 minutes, a class of 30 would produce about 600 judgements. The app then puts the work items in order based on the number of votes.
Comparative Judgement
This method is called comparative judgement. This concept has been around for at least 100 years, but our educational system uses an absolute rubric model. This means that a given piece of work has to contain certain elements to achieve full marks. While this may work fine for a Maths assessment (whereby only the actual answer is marked, not the workings), it falls down on more subjective assessments. But the comparative judgement method excels on more subjective assessments and is gaining steam amongst teachers in the UK.
Benefits to Teachers and Students
This probably explains why in one weekend, with a small push on Twitter, we had 120 new teachers sign up for the app across 100 schools. The app yields a few benefits for teachers and students.
Firstly, it saves teachers time. Teachers can spend hours marking work in the evenings and this app can save most of that time.
Secondly, it can help students learn. This is because they are exposed to a lot of other answers from other students immediately after they have learnt the material and written their own answer. The class can then see the best answer at the end and discuss it.
Finally, teachers can get an immediate feedback loop on how well their students understood the material they tried teaching them. They get this by seeing and reading the best answer just a few minutes later. They can then reinforce the parts the students failed to include in their answers.
If you’re a teacher, you can try it out using this invite link.
How Did This Project Come About?
An old friend, Ben White, got in touch with me last October with an idea. We met while studying together at London School of Theology in 2005. He’s a Psychology teacher at a secondary school in Kent. He’s been researching the “comparative judgement” method for the past year. He explained that while a company called No More Marking has a product to help teachers use this method for assessments, no-one had built a tool for the classroom to get students involved in the process.
I liked this idea for a few reasons. It’s a simple concept that is a good fit for technology and is relatively easy to build. If it works, it would have a social impact in saving teachers time and helping students learn. It is also commercial in that if it works, teachers and/or schools should be willing to pay for it. This would help us make it sustainable and scale its impact. And finally, I had a couple of “co-founders” to work with – Ben and his teacher friend, Dan Boorman. This would be more fun than working on my own and we could achieve more together. Plus they bring a lot of domain expertise as they are both teachers.
Choosing to Build a Web App
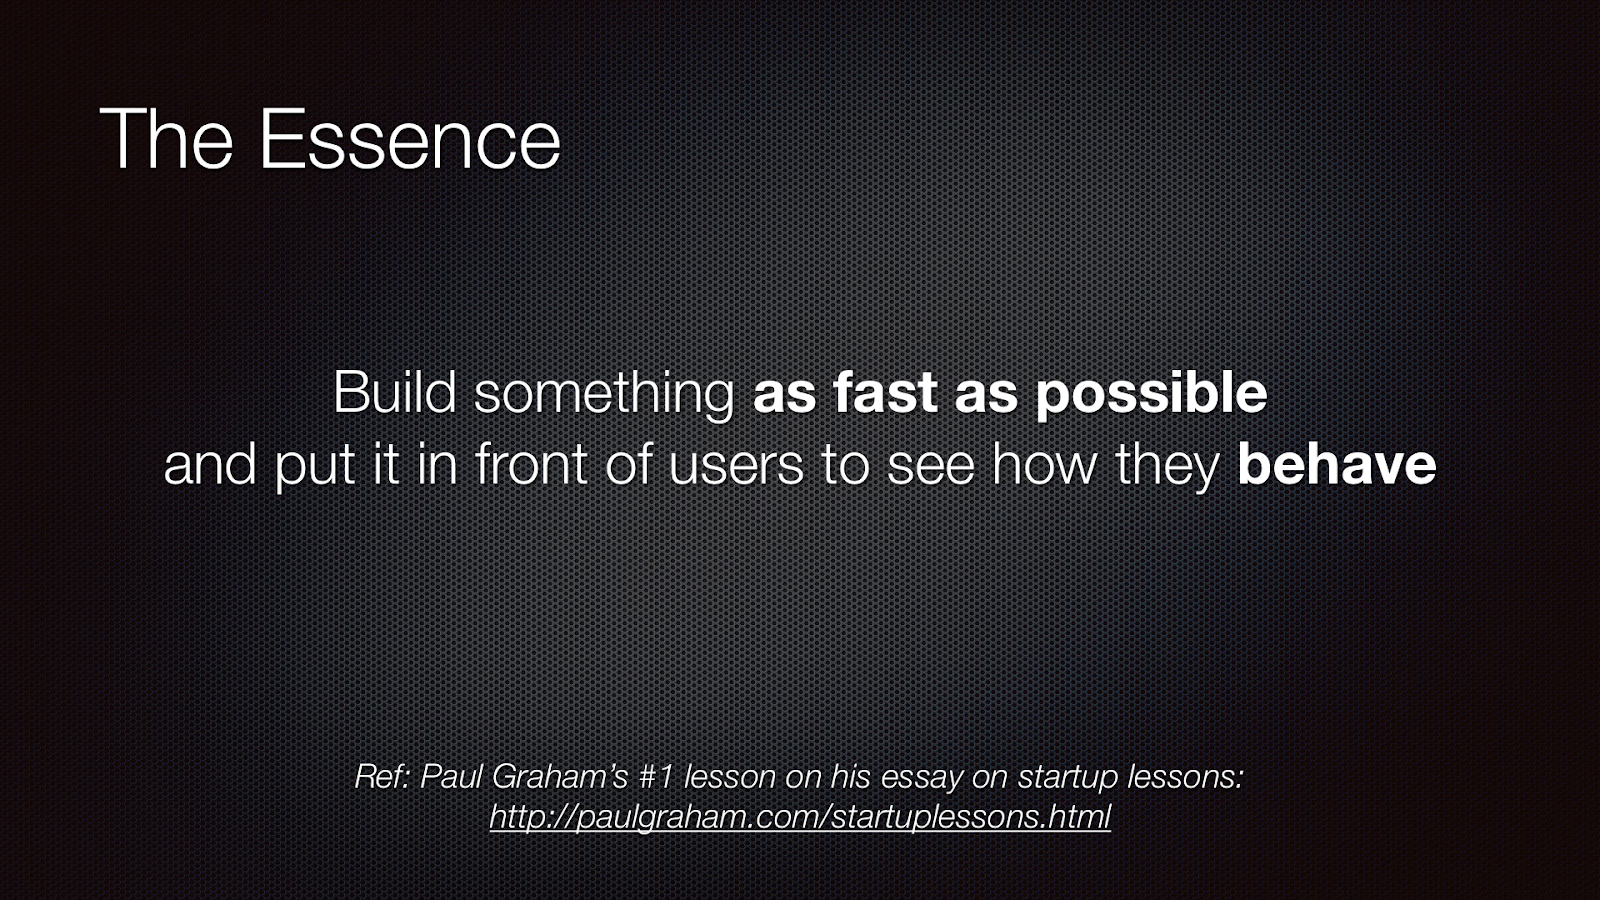
So towards the start of January, with the Malaria Challenge chatbot work concluded, I started on this project. We decided that building a working product would be a good first step so that we could test the concept in a classroom. So I went about building a “minimal viable product” as fast as possible.
I chose to build it as a web app for a few reasons. It would work across multiple devices (iOS, Android and laptops). It could be easily shared and used by teachers and students by just going to a link, without needing to install an app. And everyone would always see the latest version of the product as I make changes over time (without having to install updates).
I did need to test one aspect of technical feasibility first though – the ability to take photos within a web page. I tested this using simple HTML and Javascript code and it worked fine.
Choosing the MEAN Stack set of Technologies
I chose to use the MEAN stack to build this. This is a combination of a few technologies for building web apps. MongoDB (for the database). Express (a backend web application framework). Angular (a front-end web app framework). And Node (a Javascript runtime environment). The benefit of using these technologies is that the consistent language across all of them is Javascript. Moreover, I was already familiar with MongoDB from my previous chatbot projects. The only gap I had was my knowledge of Angular – I had never used this framework before. So the first few days were a bit slower as I got up to speed with this new framework.
In hindsight, I’m happy with my choice. But it turns out that Angular is the second most common frontend web app technology. The most popular is React. So I’ll probably use React for my next web app project. But Angular has turned out to be a great choice for this one.
Building the Minimal Viable Product
So I went about building the first version in 7 working days (60 hours). I had some time pressure as I had an upcoming 10-day trip to India. If I shipped this first version before my trip, Ben and Dan would be able to test it while I was away. This would accelerate our progress.
Core Features
The first version contained three key features:
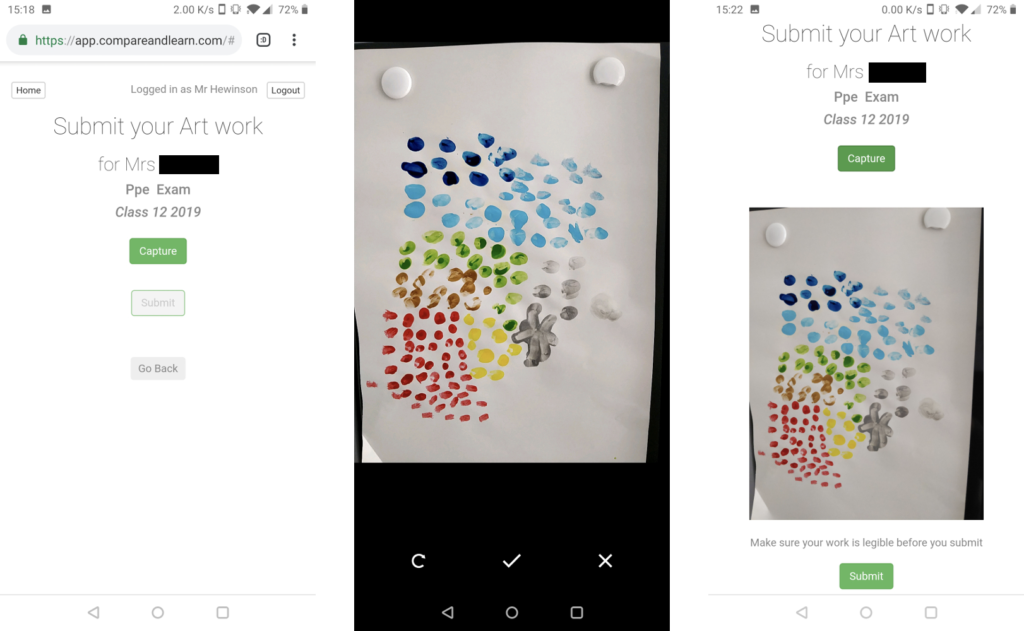
1. Submit work screen – this gave the student the ability to take a photo of their work and submit it. I then stored the image in Amazon S3 storage.
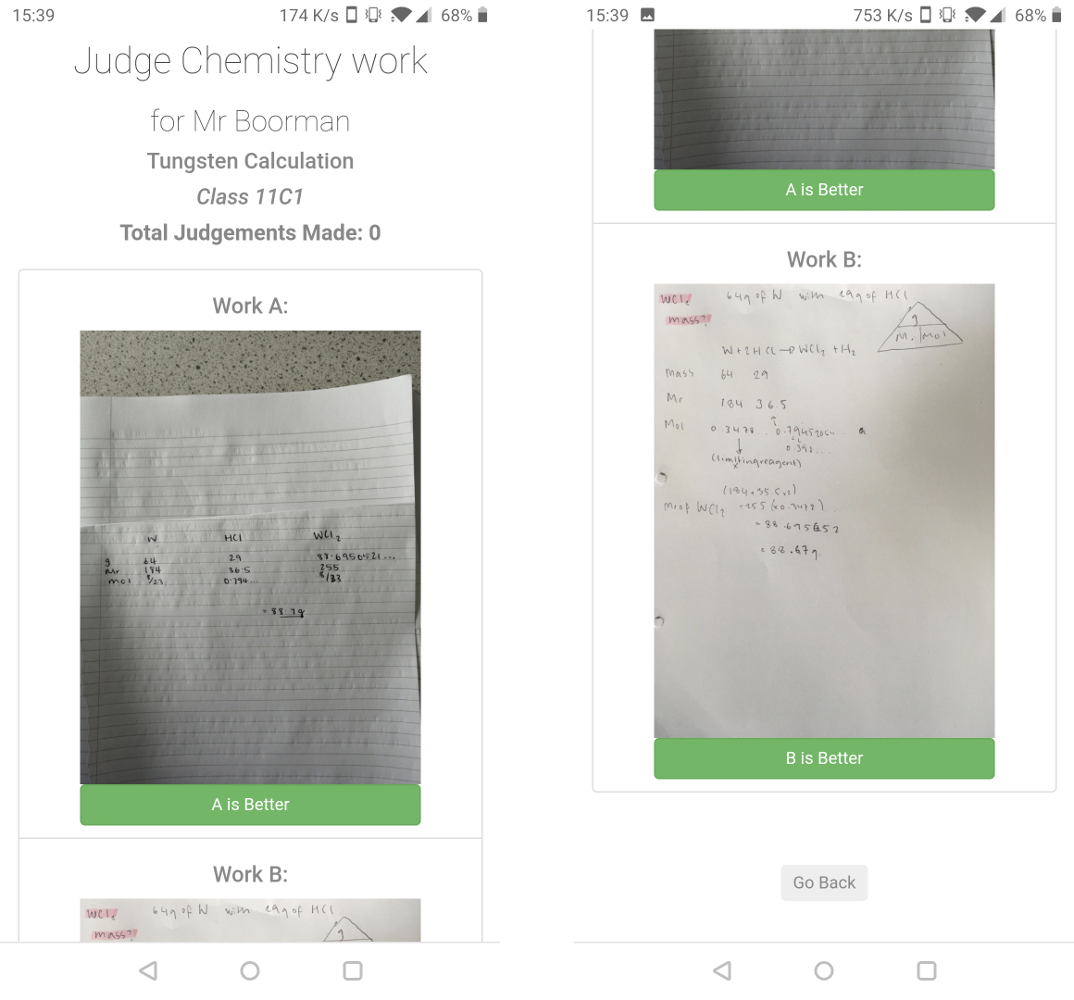
2. Judge work screen – this presented two randomly selected pieces of work for that task (not including the student’s own work) and asked them to decide which is best. After each selection, a new pair is generated and shown.
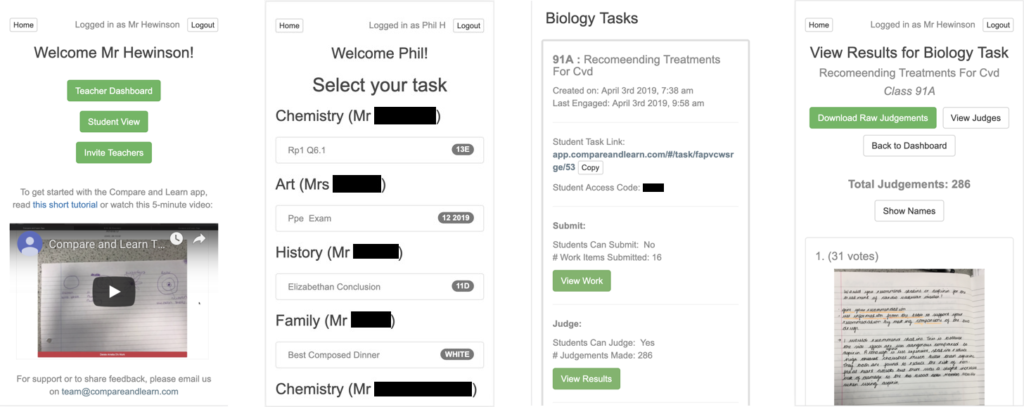
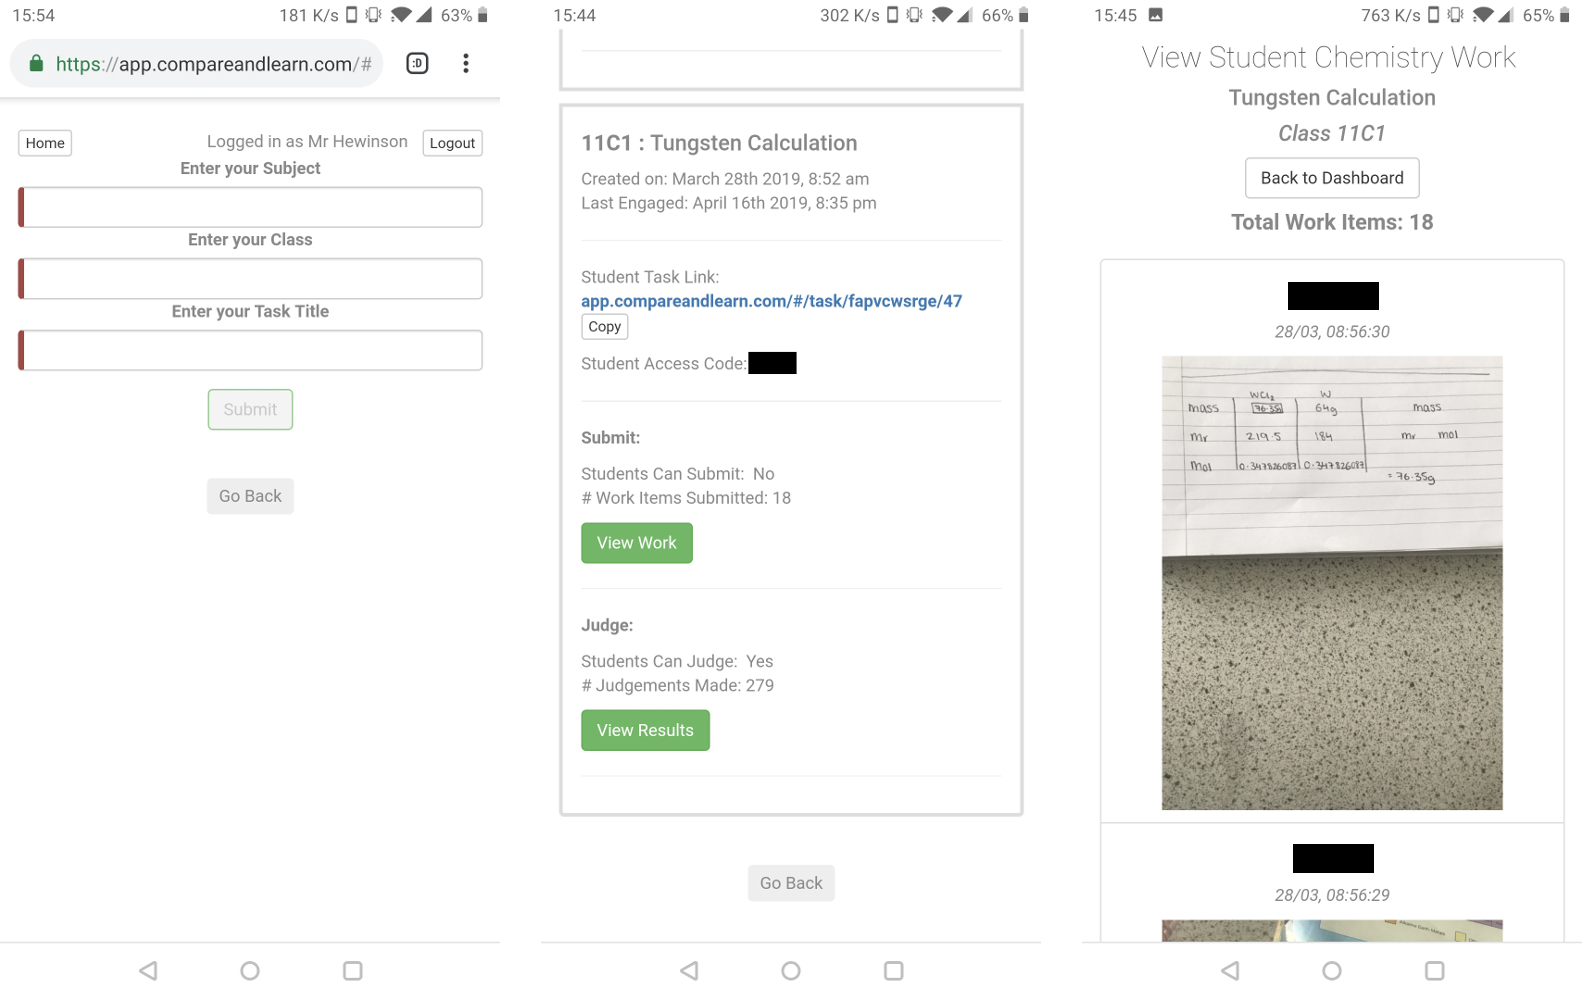
3. Teacher dashboard – this was held behind a username/password. This allowed teachers to create new tasks (with titles, subjects and class names), view work items submitted and download all judgements made in CSV format. I didn’t have time to display the results in the app before India, so Ben and Dan would need to analyse the CSV results to determine which work item had the most votes.
Other Features
In addition to these core features, I built a few other things too.
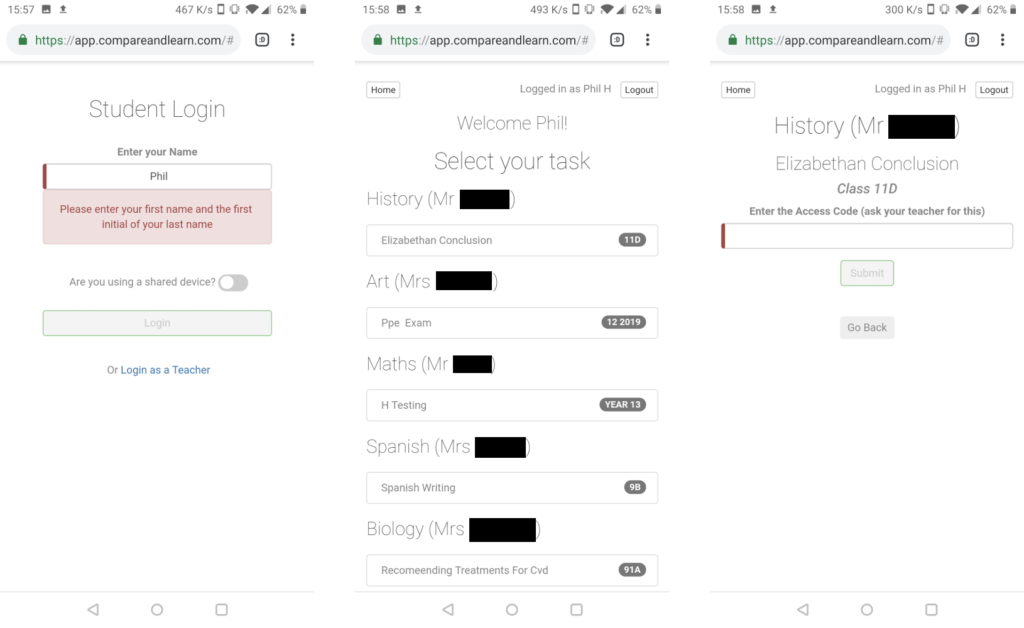
Students had a login screen that only required them to enter their first name and the first initial of their last name. This was both simple and quick to do and avoided any GDPR / privacy issues. And most importantly, the teacher would know whose work belonged to which student. I also created a top bar showing who was logged-in and the ability to log out. This was particularly useful on shared school iPads.
Students had a home page showing all tasks available to them for submitting and judging. This also contained feedback on whether they had submitted work for a given task or how many judgements they had made. All tasks could also be linked to directly via a link that the teacher could share. Tasks could only be judged though after the student had entered a random four-character PIN code that the teacher could see in their dashboard. This prevented students in other classes from judging maliciously or erroneously.
Challenges
The seven days had some painful moments too though! Learning Angular wasn’t too straightforward – I was up to speed in 2-3 days, but there was a learning curve! I built the image capture part over a few hours. The camera displayed a live feed of what it can see on the web page and there was a button to capture the image. But when I tested it on my iPad, it didn’t work 😞… it turns out that iOS doesn’t let you stream the smartphone camera inside a web browser. So I had to spend a few more hours refactoring my code to use the native camera instead. And the most painful issue was uploading the images to Amazon S3 storage. I had never used this before and debugging it was very difficult. That took 6 hours of my time!
But I got it finished by 10pm the night before I was due to fly to India. I had my fingers crossed as I left my laptop at home. So if it didn’t work, it would have to wait for my return. But I was pleasantly surprised to see lots of activity by Ben and Dan when I checked into the teacher dashboard on my smartphone during my time in India. It was fun to see real student work in the app with hundreds of judgements made in some cases.
Building the Second Version
The three of us debriefed after my trip to India in early February. They shared a few bugs that needed fixing and a few features that would help a lot.
The most important bug was an iOS rotation issue. For most people that submitted photos via their iPhone or iPad, the image would be rotated 90 degrees. So it would display sideways during the judging phase. I won’t go into this issue in detail, but it was extraordinarily painful to fix and took 14 hours in total!
Other than that though, I fixed a few simple bugs and made a few tweaks. I also added these features:
- Ability to delete or archive tasks to keep the teacher dashboard clean
- Require teachers to review images submitted before entering the judge phase
- Allow teachers to set a minimum time to judge for a given task
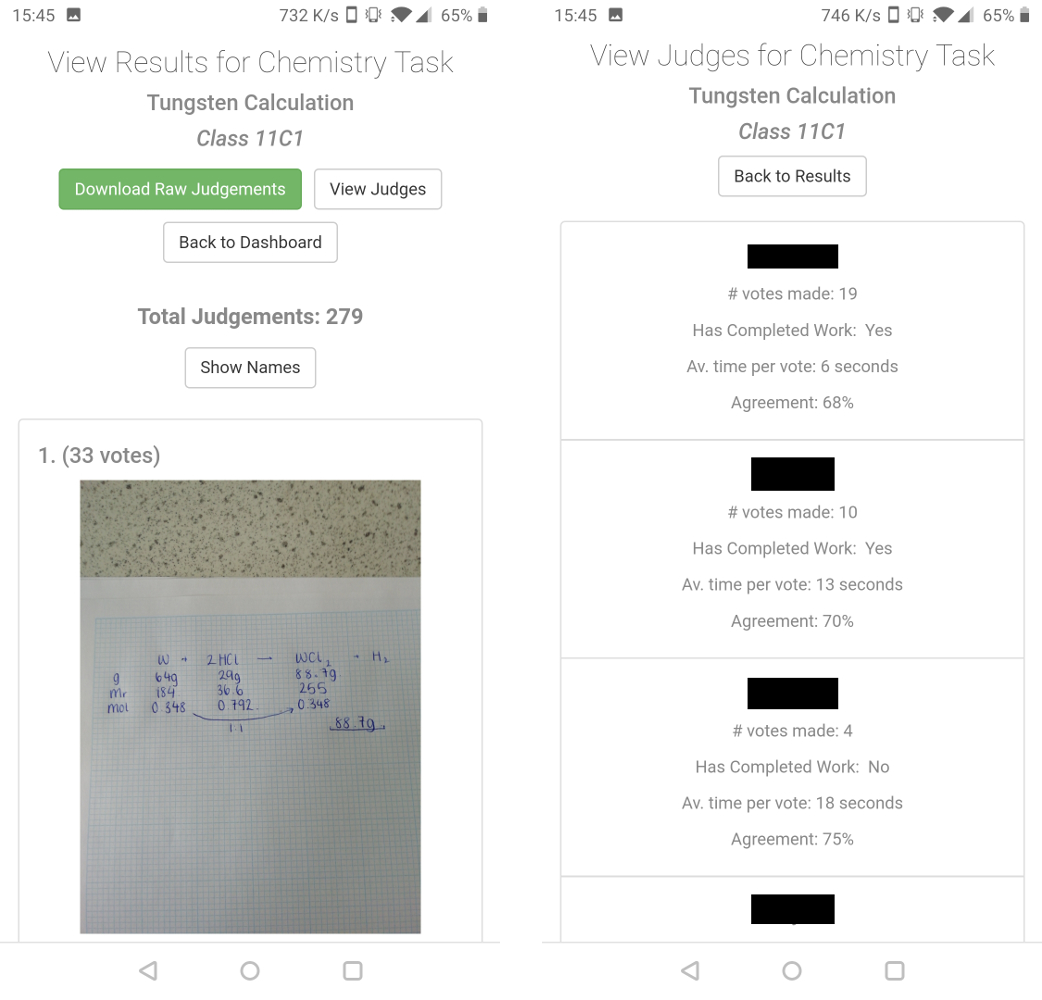
- Show ordered list of work items by number of votes in the app
- Show the list of judges, average time to judge and their accuracy (relative to the final ordering of work items). Also provide the ability to delete judgements from a given judge
This second version took a total of 6 working days (50 hours). This enabled us to test with more teachers as it was now simple enough to use. So Ben and Dan recruited more teachers from their school to test with over the next couple of weeks.
Scaling to More Teachers
With the exception of a couple more bugs, this second version worked well. The feedback from the teachers was positive. Some teachers were even bumping into Ben and Dan in the school corridors and asking for access. This was a good sign. So we wanted to scale further to teachers in other schools.
However, this required creating teacher accounts and logins. So far, each teacher used the same username and password. That meant that their dashboard contained all tasks from all teachers, so it was a little crowded. We really needed separate logins and accounts per teacher. It would also be useful to introduce the concept of a “school” – i.e. a mapping between a teacher and a school. This would mean that students in a school could see all tasks from all teachers in that school. Moreover, it would make future features possible, such as accepting payments from schools.
Features to Support Teacher Accounts
So I set about building separate teacher accounts linked to schools. This required building the following:
- Invite links so that existing teachers could invite new teachers. This can be either from the same school or a different school (we’ve kept it invite-only for now)
- New account creation page that is linked to from the invite links. This allows new teachers to enter a few details such as name, email and password to create their account
- A new login screen for teachers to enter their email and password
- Re-architect the web app to accommodate schools and teachers (e.g. so that each school has a separate URL)

This was actually a lot of work and took about 4 working days in total (30 hours). It was worthwhile though and necessary work. This enabled us to scale from about 10 teachers to potentially hundreds and thousands.
Naming it Compare and Learn
We also landed on the name “Compare and Learn”. So we registered the domain www.compareandlearn.com and re-pointed app.compareandlearn.com to the web app. We’ll create a home page there at some point, but it’s not yet a priority.
Tracking Usage
As Ben and Dan started inviting more teachers to the web app, we needed a way for us to see how people were using it. With the new teacher accounts, we could no longer see everyone’s activity. So I went about building “super access” functionality for the three of us.
Computing and Storing Metrics
The first part of this was to make sure I was tracking and computing all the metrics we cared about. While I technically stored all the data I needed, many of the things we were interested in tracking required computing from the existing data. For example, I stored the id of the teacher who invited another teacher. But I didn’t store how many invites were accepted by a given teacher. I decided to pre-compute and store all of these. This meant that when we go to access this data, it wouldn’t result in expensive database computations. This work took about 12 hours.
Here are some of the examples of the values I pre-computed:
- Number of invites accepted by a given teacher (also split by same school and different schools)
- Number of tasks created, work items submitted and judgements made by a given teacher and school
- When a teacher or school last engaged. This is defined by the time of the last action, whether it be task creation, work item submission or judgement made
- The number of engaged tasks (as defined by a task with at least 10 judgements) for each teacher and school
Viewing Metrics
I then built the “super access” part for the three of us. This involved creating a new secret access point that would be hard for someone else to find. I also added in a few other layers of security to protect against a malicious hacker trying to access the data.
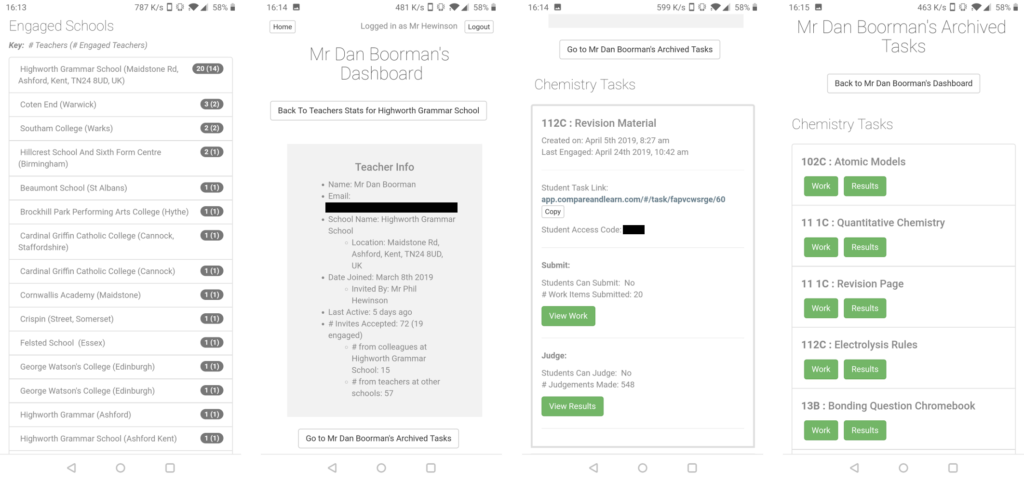
I then built the ability for the three of us to see at a glance the stats for all schools and individual teachers. I also created a read-only version of a teacher’s dashboard. This enabled us to see what tasks they’ve created as well as the work items submitted and their results after judging.
This all took about 18 hours.
A Few More Iterations
The three of us continued to have weekly calls to check-in on activity and feedback and agree next steps and priorities.
Optimisations
I introduced a few hacks into the code earlier on (i.e. I cut some corners). So I spent some time cleaning up those, which will reduce the likelihood of future bugs in those areas. It may even fix a few existing issues some students are encountering.
Our main goal after supporting separate teacher accounts was to ramp up the number of teachers using the app. So we opened up the ability for any existing user to invite other users. As new teachers joined from other schools they probably wouldn’t know how to use the app. So Dan created a short tutorial video and we embedded it on the homepage of the teacher’s account.
When a student takes a photo of their work, I compress the image before saving it. This saves storage space and loads quicker for students in the judge phase. I spent some time looking into the impact that different levels of compression had on the clarity of the image. After some experimentation, I reduced the compression by half so that the images were twice the size as that had a good trade-off with increased clarity.
Getting Feedback
We also created a new shared email address called team@compareandlearn.com. We shared this in the app if teachers had feedback to share or required support. One request that came in after a couple of weeks was a teacher needing to reset their password as they had forgotten it. So I spent 4 hours building a flow that enabled teachers to reset their password. This means we can take care of requests like this in the future.
Finally, I improved the “super access” capabilities. I enabled the three of us to see a full list of teachers (as well as schools). I enabled us to filter and order on different attributes. I also built the ability for us to download the data so we can further analyse it if we need. This also allows Ben and Dan to easily create new Mailchimp campaigns for communicating with our users and soliciting feedback.
This phase took a further 24 hours.
Current Status of the Project
So after almost 200 hours of coding, the software is in pretty good shape. It’s scalable and I’ve built the tools for Ben and Dan to get the feedback we need to inform the next steps. Coincidentally this is about the same amount of time it took me to get the Malaria Challenge chatbot into really good shape and ready for launch.
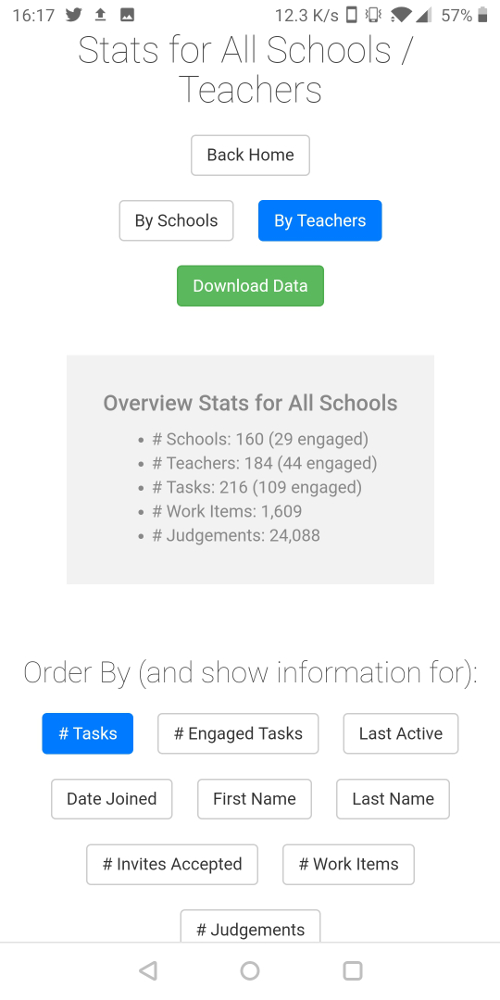
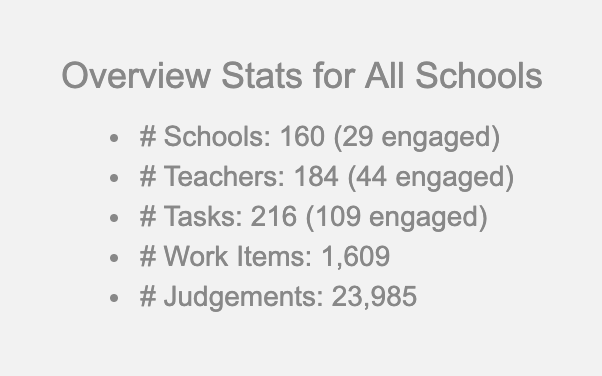
We now have 184 teachers across 160 schools who have created accounts. And 44 teachers have used it meaningfully with at least one class of students. Here is a screenshot of the high-level stats from the “super access” part of the app that Ben, Dan and I have access to:
So how did we scale to this point and how are we focusing our time going forwards?
A Goal-Based Approach to Scaling
After validating the initial concept with Ben and Dan, followed by a handful of teachers in their school, we’ve taken a goal-based approach to scaling. This is similar to how many tech startups scale, including Monzo. It brings focus.
What’s the Overarching Product Goal?
Firstly, it’s important to identify the overarching goal for the product. In our case, it is to get thousands of teachers using our product regularly and paying for it. If we achieve that we will have built a sustainable and healthy business. But more importantly we will have likely made teachers’ lives much easier (as they are choosing to use this regularly). And hopefully we’ll be helping students learn better too.
What Sequence of Goals Will Get Us There?
So how do we get there? Well, here are the goals for each step in the journey for us beyond validating the initial concept with a handful of teachers:
- Get 50 teachers to use it at least once
- Get 50 teachers using it regularly
- Get 50 teachers paying for it
- Scale to thousands of paying teachers
This is effectively funnel optimisation. But if we learn along the way that a particular goal is unattainable or harder than expected, we’ll learn why and have the opportunity to iterate, pivot or even stop if we determine that this just isn’t valuable for teachers. In fact, evaluating the “value hypothesis” (i.e. is what we have built creating value for our users?) at each step in the process is the most important thing to do. Marty Cagan talks about this in his book Inspired.
Getting 50 Teachers To Use It Once
Once I had built separate teacher accounts and logins, we chose the first goal above. Get 50 teachers to use it at least once. This is specifically defined as creating a task with at least 10 judgements made (a metric I am specifically tracking for this purpose). In order to do that, we needed to significantly drive up the number of accounts created.
So Ben and Dan pushed it quite hard on Twitter and other channels over one weekend. We received about 120 new signups! Coincidentally this coincided to me completing my work on the initial “super access” part of the app. So when I launched this feature and looked at the stats for the first time, I didn’t quite believe what I saw! Last time I checked two days before, we only had about 20 teachers! That was a pleasant surprise 😉
Getting 50 Teachers Using It Regularly
We’re now at 44 engaged teachers, which is very close to our goal of 50. So we’ve moved our attention to the second goal – to drive up the number of regular users. This goal will be split into sub-goals. The first being to drive up the number of teachers who have used it more than once. So far, 23 of the 44 engaged teachers have used it more than once. But only 8 have used it more than twice (excluding Ben and Dan). And only 2 of those are teachers outside of Ben and Dan’s school.
So Ben and Dan are currently focused on getting feedback from teachers outside of their school who have used it once to see if they plan to use it again. Then hopefully have a conversation with them over the phone to build a better understanding. This will then inform our next steps.
If you’re a teacher and want to try it out, click on this invite link! 😊
What Else Have I Been Up To?
Visiting Scott Harrison, Founder of Charity: Water, In New York City
Aside from this project and my trip to India at the end of January, I also visited New York at the end of February to meet with Scott Harrison, Founder and CEO of Charity: Water. I read Scott’s book, Thirst, over Christmas and it was the most inspiring book I’ve read for years.
I was lucky enough to get a personal introduction to Scott from one of the partners of Zinc, a social impact tech accelerator in London, whose founders I’ve been supporting. So I flew to New York for a few days and spent an hour with Scott and his second in command, Christoph Gorder.
I shared my journey. Scott shared his insight that the biggest problem he determined for giving people access to clean water is capital (i.e. raising money to fund water projects). So that’s what they focus on. And they let their local partners in each country manage the projects and report back to them. Scott and Christoph shared their challenges around effectively disbursing the high volumes of funding they now have, how they select partners and how the cost to provide clean water per person will increase as the people remaining without access live in increasingly rural areas.
Finally, we shared the challenges of having a young family. And how hard (or impossible) it would be to found a charity focused on helping people in developing countries, given the time, energy and travel needed to make it happen. But if I did go that route, Scott advised me to find a co-founder who is passionate about the same cause and can travel, while I focus on building technology at home. Honestly though, I’m far more likely to focus on helping people closer to home for the next few years.
Consulting for Zinc
In January, I ran an office hours for the entrepreneurs at Zinc. Following this, I did four days of paid consulting for them in March. During this time, I worked with one founder in particular, Isabelle. I built an initial version of a product for her. Isabelle is the founder of Ketka and makes interactive stories for children. Her vision is to get them away from having too much screen time and help them develop their social and emotional skills as well as their creativity.
I built a web app, using the same technologies that I used for Compare and Learn. The web app enables kids to listen to interactive stories on any device. They can select the story to listen to and listen to the first short audio clip. At the end of the clip, they have a choice on which route to take by pressing one of the buttons. This then takes them through the story on the route they choose. I also created a management section of the app so that Isabelle can easily create and edit the stories. Zinc could only pay me for four days initially, so I was only able to build a fairly basic web app for Isabelle’s needs. But I think it’s been helpful at accelerating her learnings towards product-market fit. If you have young kids, try out the stories here: https://www.ketka.co/stories.
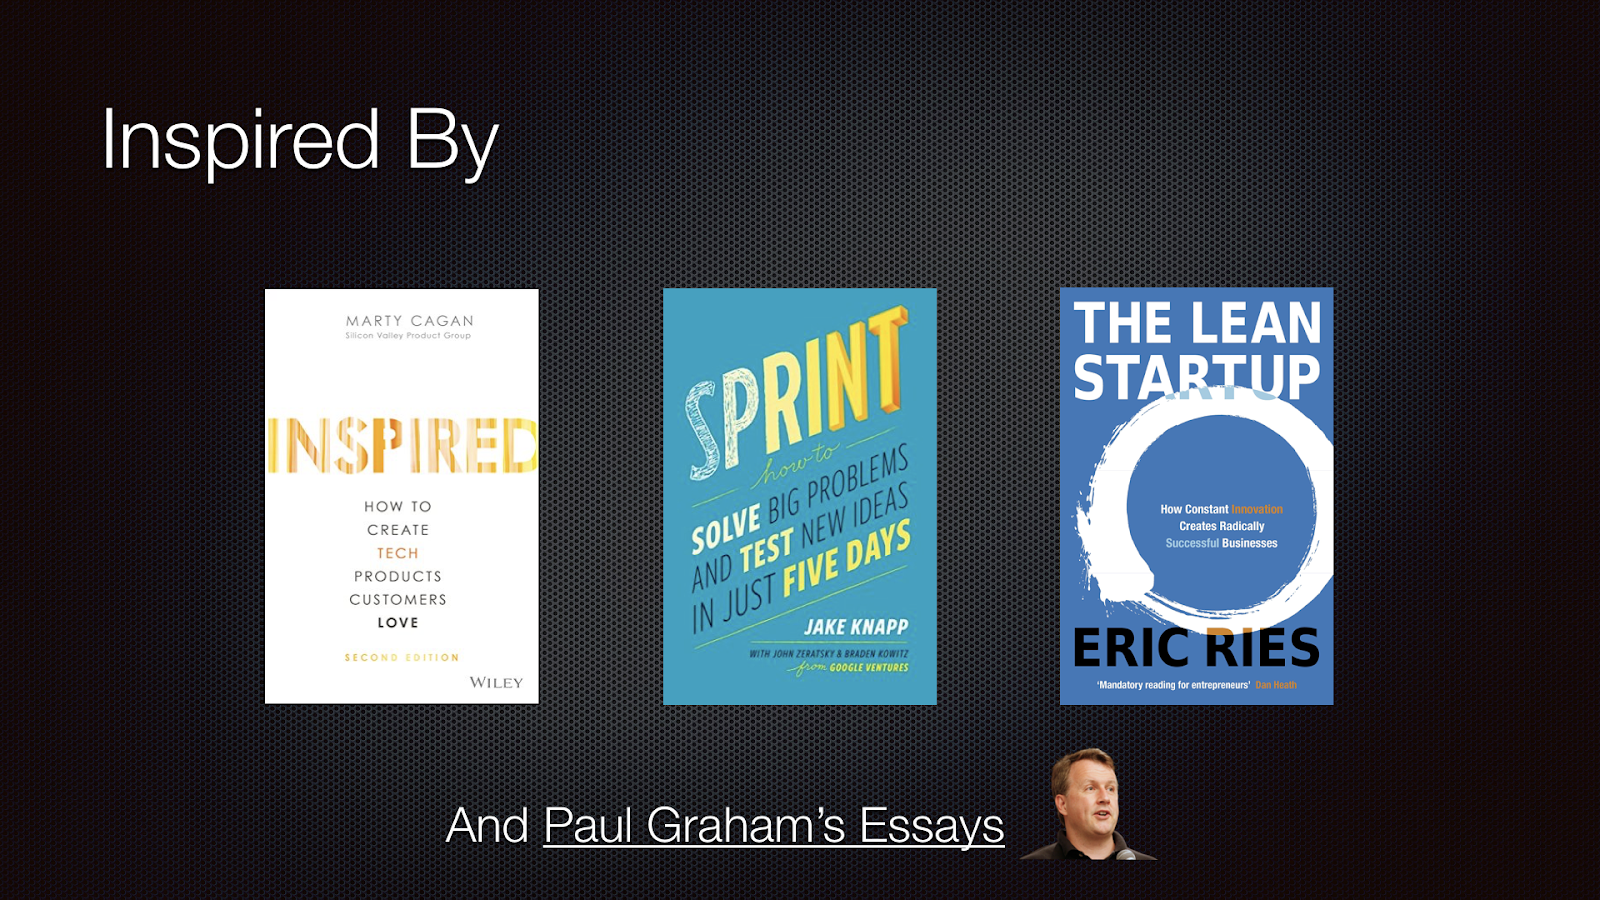
A Talk at Tearfund on Building Products People Love
The Head of Digital at Tearfund invited me in to give a talk on building digital products last week. So I spent some time preparing and trying to codify how I go about building products. I drew on a lot of examples from this project and the Malaria Challenge chatbot. And the preparation was actually really helpful in solidifying my own understanding of my process for building products. If you’re interested, here’s the slide deck I presented. And here are the key slides that summarise the narrative I presented:


I may write a separate blog post on this at some point.
What’s Next for Me?
So what’s next? Well, I’ll continue to invest in the two projects I’ve started. The Malaria Challenge chatbot is actually really close to being live. I’ll post a blog post on that as soon as it’s available and ready to try out! I’ll also continue to drive the Compare and Learn web app forwards with Ben and Dan. But as the software is in pretty good shape, more of the work will be with Ben and Dan to push it out and gather feedback to inform the next steps.
So I’m ready to sink my teeth into another big project I think. And I’ll probably prioritise something that will provide some income! I’ve got a range of opportunities to explore, spanning existing startups, consulting opportunities and board positions. And I’m also mulling over a few other social impact startup ideas of my own. I’m looking forward to spending some time thinking through this before landing on my next area of focus.